Introduction
A lot of companies are thinking about migrating their infrastructure to Cloud and one of the most important show stoppers is downtime, especially when it comes to database migration. In this post, I am going to show you how we migrated our on-premise MySQL Server to Amazon Aurora for MySQL in near-zero downtime. A good majority of the process has been written in bash scripts and I’m going to explain them step by step, however, you can find all the scripts in this repository.
Simplified Process
A usual process for migrating a database is something like this:
- Create a backup from the source database
- Restore the backup to the destination
- Setup replication from source to destination
- Stop applications
- Make sure no write is happening to either of databases
- Wait for the destination to catch up
- Change connection strings to use the new database
- Start applications
It seems simple, doesn’t it? But let’s be honest, database migration is not that simple unless your database is pretty small and you are allowed to have several hours of downtime. If that’s the case, don’t bother designing a zero-downtime migration process. Just follow those steps and you’re done. But you probably are here because you can’t afford downtime and you know that steps 4-7 mean downtime. We call it Cut-Over. Migrating the database of every live application involves a cut-over, when you have to stop the writes to the current database, activate the new database and continue the writes to it. The cut-over is necessary to ensure the consistency of the database. You have to ensure that writes could NEVER happen to both databases at the same time. The faster you can do cut-over the less downtime you will have.
Architecture
Our previous architecture before migration looked like this:
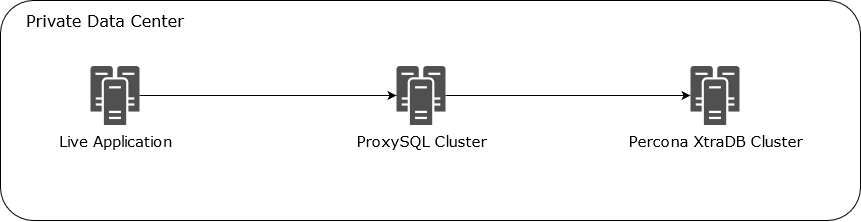
We used ProxySQL to provide high availability and read-only load balancing. Having a proxy gives you the ability to route your database requests to the right destination at any moment. ProxySQL is a high-performance proxy for MySQL and you can actually use it as the primary point of the cut-over without ever need to change your application configuration or even stopping them. You can simply add a proxy layer to your architecture in zero downtime, there are so many benefits to it and I highly recommend to do that even if you are not doing a migration. We can also script (and automate if you want) the whole cut-over process with bash scripts, so you can ensure that the cut-over will happen flawlessly. Let’s do it.
Preparation
Preparation involves these steps:
- Create a backup from the source MySQL database
- Restore the backup to the destination Aurora cluster
- Setup replication from source to destination
There are so many resources on the web that cover these topics, so, I am not going to cover them again, but you can find some of them in the Useful Links section at the end of this article. Make sure to study them before starting the migration, they all have great points that make your life easier. But I would like to just highlight some of the important factors that you might need to consider before moving forward to the cut-over.
- Ensure that Charset and Collation configuration for the servers and databases are identical
- Ensure that replication lag is minimal using
show slave status;statement - Set binlog retention configuration on Aurora cluster using this statement:
call mysql.rds_set_configuration('binlog retention hours', X);where X is the value in hours you want to keep the binlogs - Check the connectivity on your default port (e.g. 3306) from your ProxySQL to the destination Aurora cluster
- Import timezone tables from Aurora to your current MySQL database using the following statements:
mysqldump --login-path=your_aurora --no-create-db --no-create-info mysql time_zone time_zone_name time_zone_transition time_zone_transition_type > aurora-timezones.sql

mysql --login-path=your_mysql mysql < aurora-timezones.sql
Create Users In Aurora
Ensure to create application users before the cut-over. You can use mysqlpump or pt-show-grants to migrate your users with their permissions. For mysqlpump a command like this can be used:
mysqlpump --exclude-databases=% --no-create-db --no-create-info --users --skip-dump-rows --skip-defer-table-indexes --skip-routines --include-users=user1,user2,user3,... > dump-users.sql
Make sure to remove or update IP limitation from the newly created users in the destination database.
ProxySQL Configuration
The mysql_servers table looked like this:
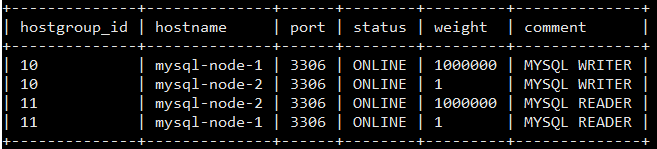
The host groups 10 and 11 handle write and read requests respectively as described in read/write split with ProxySQL. We are going to add Aurora endpoints to each group with higher weights and different comments.
Add Aurora Endpoints to ProxySQL
At this step, the applications connect to ProxySQL, it routes the database requests to the current MySQL Server and Aurora cluster is being synced with the current database via replication. Now that we have everything ready, it’s time to add Aurora Endpoints to ProxySQL. We initially add them as OFFLINE_HARD to make sure they don’t accept any request. (read Configuring Backend MySQL Servers in ProxySQL)
insert into mysql_servers (hostgroup_id,hostname,port,status,weight,compression,max_connections,max_replication_lag,use_ssl,max_latency_ms,comment)
values(10, 'aurora-endpoint.cluster.rds.amazonaws.com'
,3306,'OFFLINE_HARD',2000000,0,1000,0,0,0,'RDS WRITER');
If you are using the read/write split feature of ProxySQL, you can also add the Aurora Reader Endpoint as well. This will also help us to be able to cut-over readers first and make sure the connection between ProxySQL and Aurora is available and stable.
insert into mysql_servers (hostgroup_id,hostname,port,status,weight,compression,max_connections,max_replication_lag,use_ssl,max_latency_ms,comment)
values(11, 'aurora-endpoint.cluster-ro.rds.amazonaws.com'
,3306,'OFFLINE_HARD',2000000,0,1000,0,0,0,'RDS READER');
The mysql_servers table should look like this now:

Scripts Prerequisites
I am going to explain the cut-over process and share the scripts that I used in the following sections. All of the scripts can be found in this repository. There are a couple of assumptions that I make before moving forward to scripts:
- These scripts can run on a machine with Ubuntu 16.04 and higher with connectivity to MySQL, ProxySQL and Aurora instances, it could be the ProxySQL machine itself
- mysql-client has been installed
- Three login paths named
mysql, proxysql, aurorahave been set and tested using mysql_config_editor - I only share bash scripts here, SQL files can be found in the repo
Cut-Over The Reader Endpoints
If you have added the Aurora reader endpoint to ProxySQL, it’s a good idea to cut-over them first. It’s a safe activity that helps you identify potential connection issues before the writers cut-over. Even if something goes wrong when you route the read traffic to Aurora, it will probably just impact a small section of your application such as reports, dashboards, etc. and you can quickly revert the changes back and troubleshoot the problem without losing any transaction. You can use this script to cut-over the reader endpoints:
Failback The Reader Endpoints
You should always be prepared if something goes wrong. So, for every cut-over, we need to have a plan to failback to the previous state and then troubleshoot what went wrong later. This is how we can failback the reader endpoints if something goes wrong in the previous step:
Cut-Over The Writer Endpoints
We finally reached the REAL CUT-OVER, where you are going to have a short downtime. The shorter downtime the better. So, our focus here is to minimize downtime by scripting the process. You should also be prepared for failback in case something goes wrong. As soon as you cut-over the requests to the new Aurora cluster, new transactions are going to run against it (and you don’t want to lose them in case you have to failback to your old MySQL cluster). So, right before the cut-over, we will have to stop the replication and start a reverse replication from Aurora to MySQL. Create a user in Aurora cluster with appropriate permissions for the reverse replication:
CREATE USER 'reverse_replication' IDENTIFIED BY '<password>';
GRANT REPLICATION CLIENT, REPLICATION SLAVE ON *.* TO 'reverse_replication';
FLUSH PRIVILEGES;
Now that we have everything ready, let’s talk a little about the real cut-over process without making any changes to the application configuration:
- In ProxySQL: Set MySQL writer endpoints status to OFFLINE_SOFT, it avoids new requests to the endpoints and allows the current requests to finish
- Wait for 1-2 seconds to allow current requests to finish (depends on the average transaction time in your database, you might need to wait shorter or longer)
- In ProxySQL: Set MySQL writer endpoints status to OFFLINE_HARD. This is where downtime starts because there is no writer endpoint with ONLINE status available to route requests to
- Wait until the replication catch up on your Aurora cluster
- In Aurora: Stop replication
- In MySQL: Start reverse replication for failback (you need to ignore rds specific tables because they aren’t available in MySQL, you can ignore the tables that start with
rds_or you can completely ignore themysqldatabase) - Make sure there is no lag for the reverse replication
- In ProxySQL: Set Aurora writer endpoints status ONLINE
It will probably take 4-5 minutes if you do it manually which means 4-5 minutes downtime. So, let’s script it:
Failback The Writer Endpoints
Finally, we also need to prepare a failback process. As we already have a reverse replication in place, we can quickly failback to the previous state if anything goes wrong. It is basically the same process as the cut-over just in different direction:
Summary
Migrating a live database to a new server or platform is challenging and it could cause long downtime if you are not prepared for it. In this post, I explained how you can migrate a live MySQL database to a new RDS Aurora Cluster with near-zero downtime using ProxySQL and scripting the process in bash. Although it’s not a script to copy/paste and run, you can use it to build your own migration process that fits your system. Leave a comment below if you have any question.
Useful Links
- https://d1.awsstatic.com/whitepapers/Migration/amazon-aurora-migration-handbook.pdf
- https://docs.aws.amazon.com/AmazonRDS/latest/AuroraUserGuide/AuroraMySQL.Migrating.ExtMySQL.html#AuroraMySQL.Migrating.ExtMySQL.S3
- https://docs.aws.amazon.com/AmazonRDS/latest/AuroraUserGuide/AuroraMySQL.BestPractices.html
- https://www.percona.com/blog/2018/03/08/migrating-mysql-users-to-amazon-rds/
- https://aws.amazon.com/blogs/database/intuit-story-automate-migration-from-on-premises-mysql-to-amazon-aurora/
- https://www.revenuecat.com/blog/aurora-migration-zero-downtime
- https://aws.amazon.com/blogs/database/best-practices-for-amazon-aurora-mysql-database-configuration/
- https://youtu.be/-my0q7aADcY
- https://d0.awsstatic.com/whitepapers/RDS/Best-Practices-for-Migrating-MySQL-Databases-to-Amazon-Aurora.pdf
- https://docs.aws.amazon.com/AmazonRDS/latest/AuroraUserGuide/AuroraMySQL.Replication.MySQL.html
- https://medium.com/tensult/mydumper-myloader-and-my-experience-of-migrating-to-aws-rds-ff74fc9c1add
